Connect to Blade 3
The serial console gives you boot messages and a shell without a network connection. SSH gives you a remote shell once the board has booted and is on the network.
Serial console
A serial console gives you Blade 3's boot messages and a shell that does not depend on the network, which makes it the tool of choice when the board does not come up as expected.
You need a USB to TTL converter and a computer running Windows, macOS or Linux.
Wire the converter
Blade 3 has a three-pin debug UART header next to the Mini PCIe slot. See Debug UART for the UART connector location and pinout.
Connect only GND, TXD, and RXD. Do not connect VCC. Transmit connects to receive in each direction:
| Converter | Blade 3 debug header |
|---|---|
| GND | GND, pin 3 |
| TXD | RX, pin 1 |
| RXD | TX, pin 2 |
| VCC | Not connected |
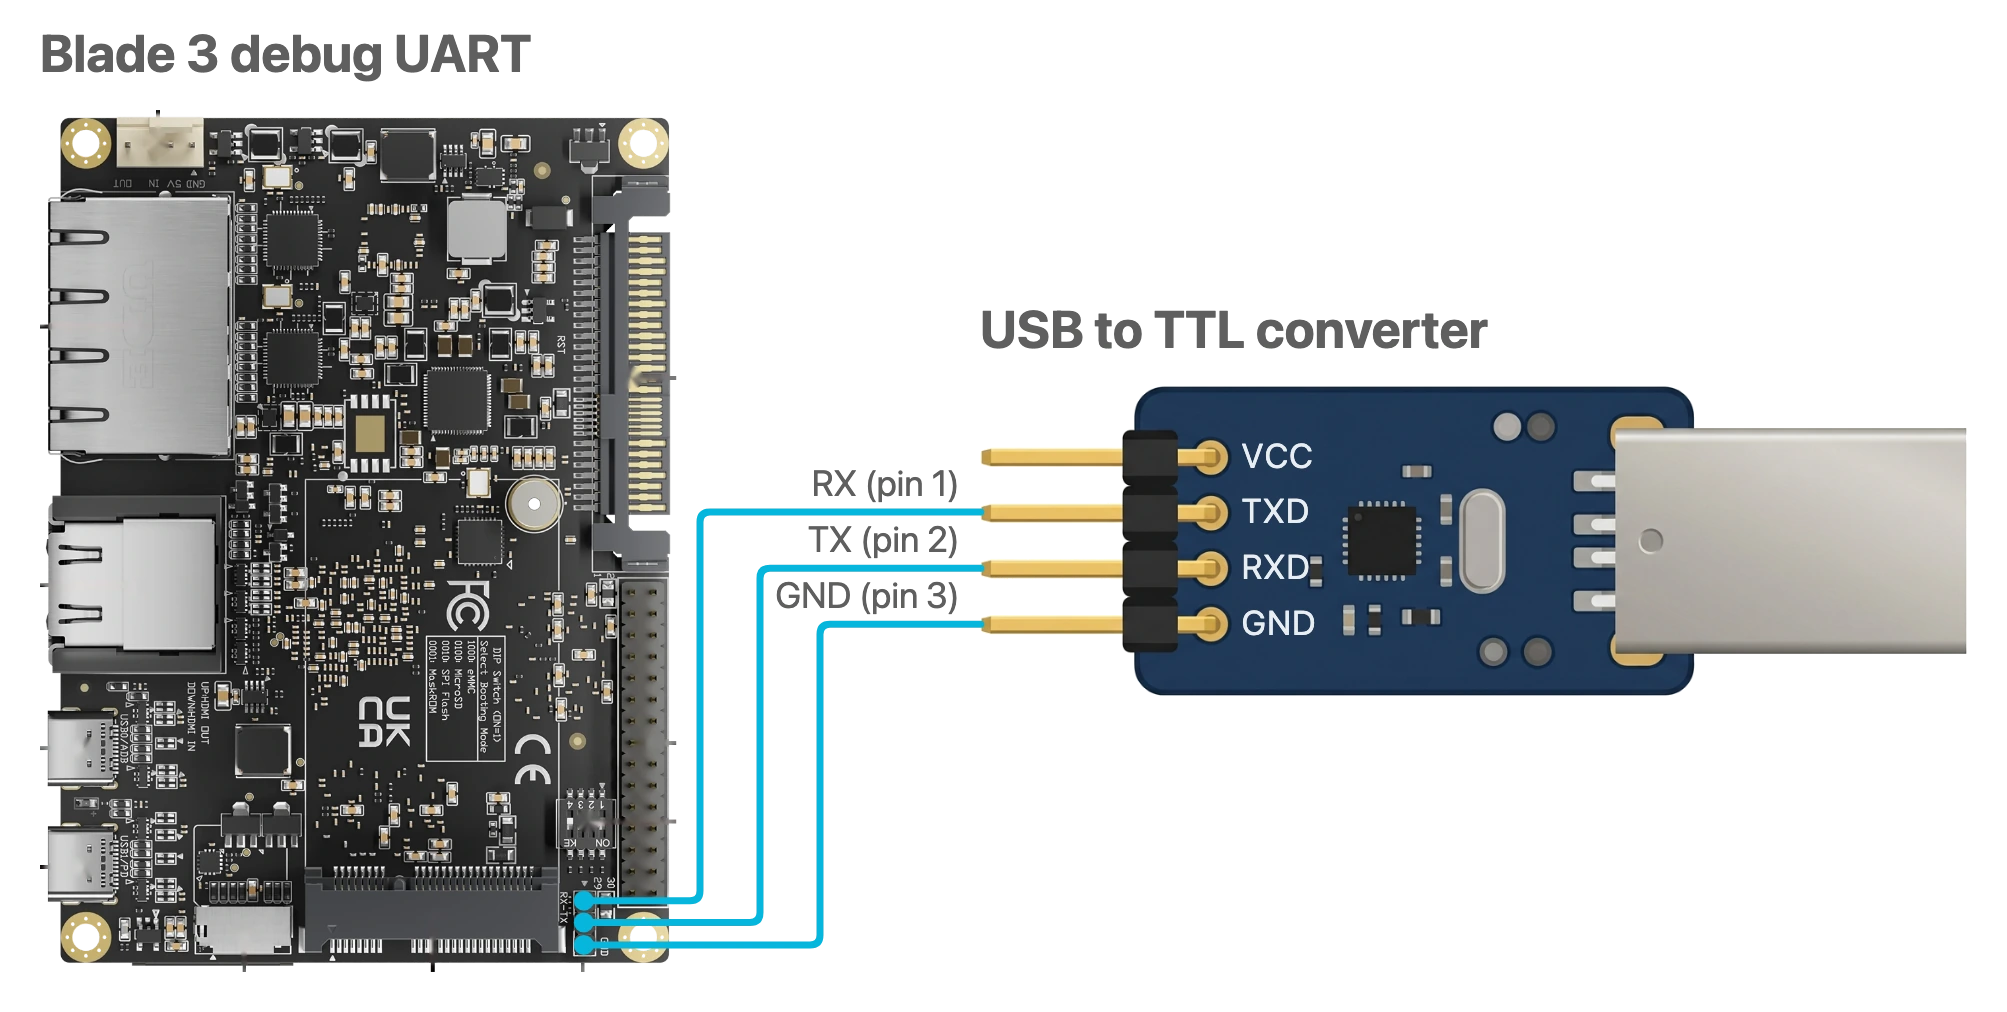
Figure 1. Converter wiring. TXD goes to RX and RXD goes to TX.
Serial settings
The debug UART runs at 1500000 baud, 8N1, with no flow control.
Some USB to TTL converter chips cannot reach 1500000 baud. Check the converter's maximum baud rate before buying one.
Connect from your computer
Follow the instructions for your computer.
- Windows
- macOS
- Linux
-
Install the driver for your USB to TTL converter. The driver comes from the converter's vendor, not from Mixtile.
-
Install PuTTY from its official download page. Choose the installer that matches your computer.
-
Plug the converter into the computer. Open Device Manager and read its COM port under Ports (COM & LPT), for example
COM4.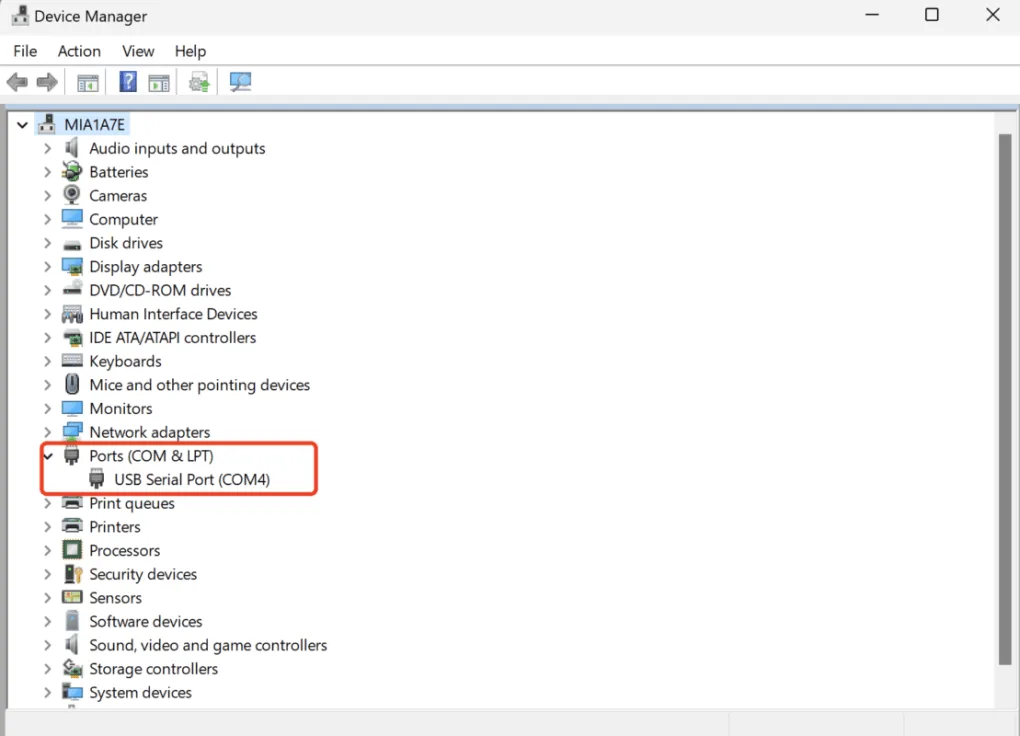
-
Open PuTTY. Set Connection type to Serial, Serial line to the COM port you found, and Speed to
1500000.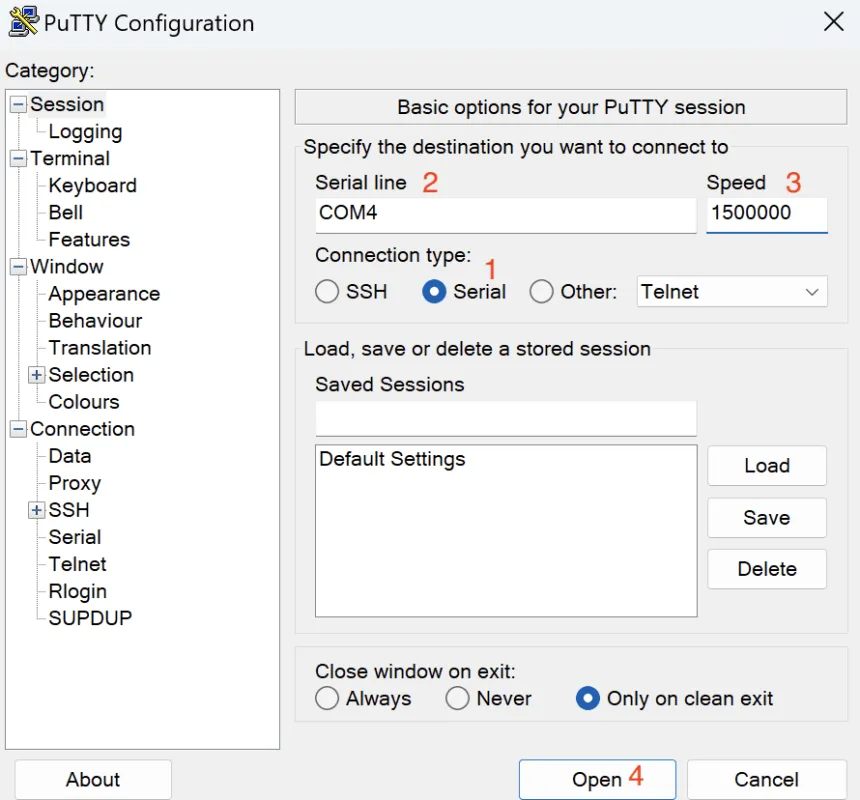
-
Click Open.
To close the console, close the PuTTY window.
-
Install Homebrew if you do not have it, then install picocom:
Host PC (macOS)brew install picocom -
Plug the converter into the computer, then list the serial devices. The newly appearing device is the serial port, for example
/dev/tty.usbserial-0001.Host PC (macOS)ls /dev/tty.* -
Open the console, replacing the port with the one you found:
Host PC (macOS)picocom -b 1500000 /dev/tty.usbserial-0001
To close picocom, press Ctrl+A, then Ctrl+X.
-
Install picocom:
Host PC (Linux)sudo apt updatesudo apt install picocom -
Plug the converter into the computer, then list the serial devices. The port is usually
/dev/ttyUSB0.Host PC (Linux)ls /dev/ttyUSB* /dev/ttyACM* -
Open the console, replacing the port with the one you found:
Host PC (Linux)picocom -b 1500000 /dev/ttyUSB0If your user cannot access the serial device, add the user to the
dialoutgroup, then log out and back in.
To close picocom, press Ctrl+A, then Ctrl+X.
Log in on the console
The console may be blank until the board outputs something. If nothing appears, press Enter.
When the login prompt appears, sign in with the credentials for the operating system running on the board. For Mixtile OS, see Login details.
Serial troubleshooting
| Symptom | What to check |
|---|---|
| Nothing appears after connecting | Press Enter. If there is still nothing, check the wiring and the baud rate. |
| Characters are garbled | The baud rate is wrong, or the converter cannot sustain 1500000 baud. |
| The port does not appear | The converter driver is not installed, or the converter is plugged into a port that does not enumerate. Try another cable and another USB port. |
| Output appears but typing does nothing | Flow control is on: turn it off in the terminal program. If it is already off, TXD and RXD are the wrong way round. The converter's TXD goes to the board's RX. |
SSH
SSH gives you a shell over the network. The board must be booted and reachable from your computer. The system must have an SSH server running before you can connect remotely.
Find the board's IP address
Pick whichever is available to you:
- Router: look for the board in the DHCP client list of your router's admin page.
- On the board: run
ip addrfrom the serial console. - Scan the subnet:
nmap -sn 192.168.1.0/24, adjusted to your subnet.
Log in
Replace <user> with a user of the system running on the board. For Mixtile OS, see Login details.
ssh <user>@<board-ip>
The first connection asks you to confirm the host key. Answer yes once and it is remembered.
SSH troubleshooting
| Symptom | What to check |
|---|---|
Connection refused | The board has not finished booting, or no SSH server is running. Check over the serial console. |
No route to host | The board is on a different subnet, or it never got an address. Check the link LED and the router's client list. |
Permission denied | Wrong user name or password for the system on the board. |
REMOTE HOST IDENTIFICATION HAS CHANGED | The board was reflashed and generated a new host key. Remove the old entry with ssh-keygen -R <board-ip>. |