Flashing an OS Image
Blade 3 runs its operating system from the on-board eMMC. To install or replace the system, you put the board into MaskROM mode, connect it to a computer over USB, and write an image to the eMMC with Rockchip Flash Tool.
Flashing replaces everything on the eMMC. Back up anything you want to keep.
What you need
- A Blade 3 board
- A computer running Windows 10 or 11, macOS 13 or later, or 64-bit x86 Linux
- A USB-C data cable, to connect the board to the computer
- A USB PD power adapter and its USB-C cable, see Power Supply
- An OS image for Blade 3
Step 1. Get an OS image
Download the image for the system you want to run. Mixtile OS is the officially supported system; its images are available from Downloads.
If the image is compressed, for example as .xz or .zip, extract it first. On Windows, use an archive tool such as 7-Zip; on macOS and Linux, run xz -d <file>.img.xz for an .xz image.
Step 2. Install Rockchip Flash Tool
Follow the steps for your computer's operating system. The download links always point to the latest release.
- Windows
- macOS
- Linux
- Download Rockchip-Flash-Tool-windows-x64.zip and extract it.
- Start the tool. On the first run it asks Install driver now? for the Rockchip USB driver. Click Yes, and allow the installer administrator rights. The status bar shows
Rockchip driver ready.when it is done.
- Download Rockchip-Flash-Tool-macOS-universal.dmg, open it and drag the app to Applications. It runs on both Apple silicon and Intel Macs.
- If macOS blocks the app, right-click it in Finder, choose Open, then click Open again.
- If it is still blocked, open System Settings > Privacy & Security and click Open Anyway.
If it still does not start, clear the quarantine attribute:
xattr -dr com.apple.quarantine "/Applications/Rockchip Flash Tool.app"
-
Download Rockchip-Flash-Tool-linux-x86_64.AppImage and make it executable:
Host PC (Linux)chmod +x Rockchip-Flash-Tool-linux-x86_64.AppImage -
Install FUSE2, which the AppImage needs:
Distribution Command Ubuntu 24.04 and later sudo apt install libfuse2t64Ubuntu 22.04 and earlier, Debian sudo apt install libfuse2Fedora sudo dnf install fuse-libsArch Linux sudo pacman -S fuse2openSUSE sudo zypper install libfuse2If you cannot install FUSE2, start the AppImage in extract mode instead:
Host PC (Linux)APPIMAGE_EXTRACT_AND_RUN=1 ./Rockchip-Flash-Tool-linux-x86_64.AppImage
Step 3. Set the boot switch to MaskROM
In MaskROM mode the board does not start any system. Instead, it waits for a computer to write to its eMMC over USB. This works whatever is on the eMMC, including a board that no longer boots.
- Disconnect the power adapter if the board is on.
- On the four-position boot switch next to the 30-pin header, turn position 4 to ON. Leave positions 1 to 3 at OFF.
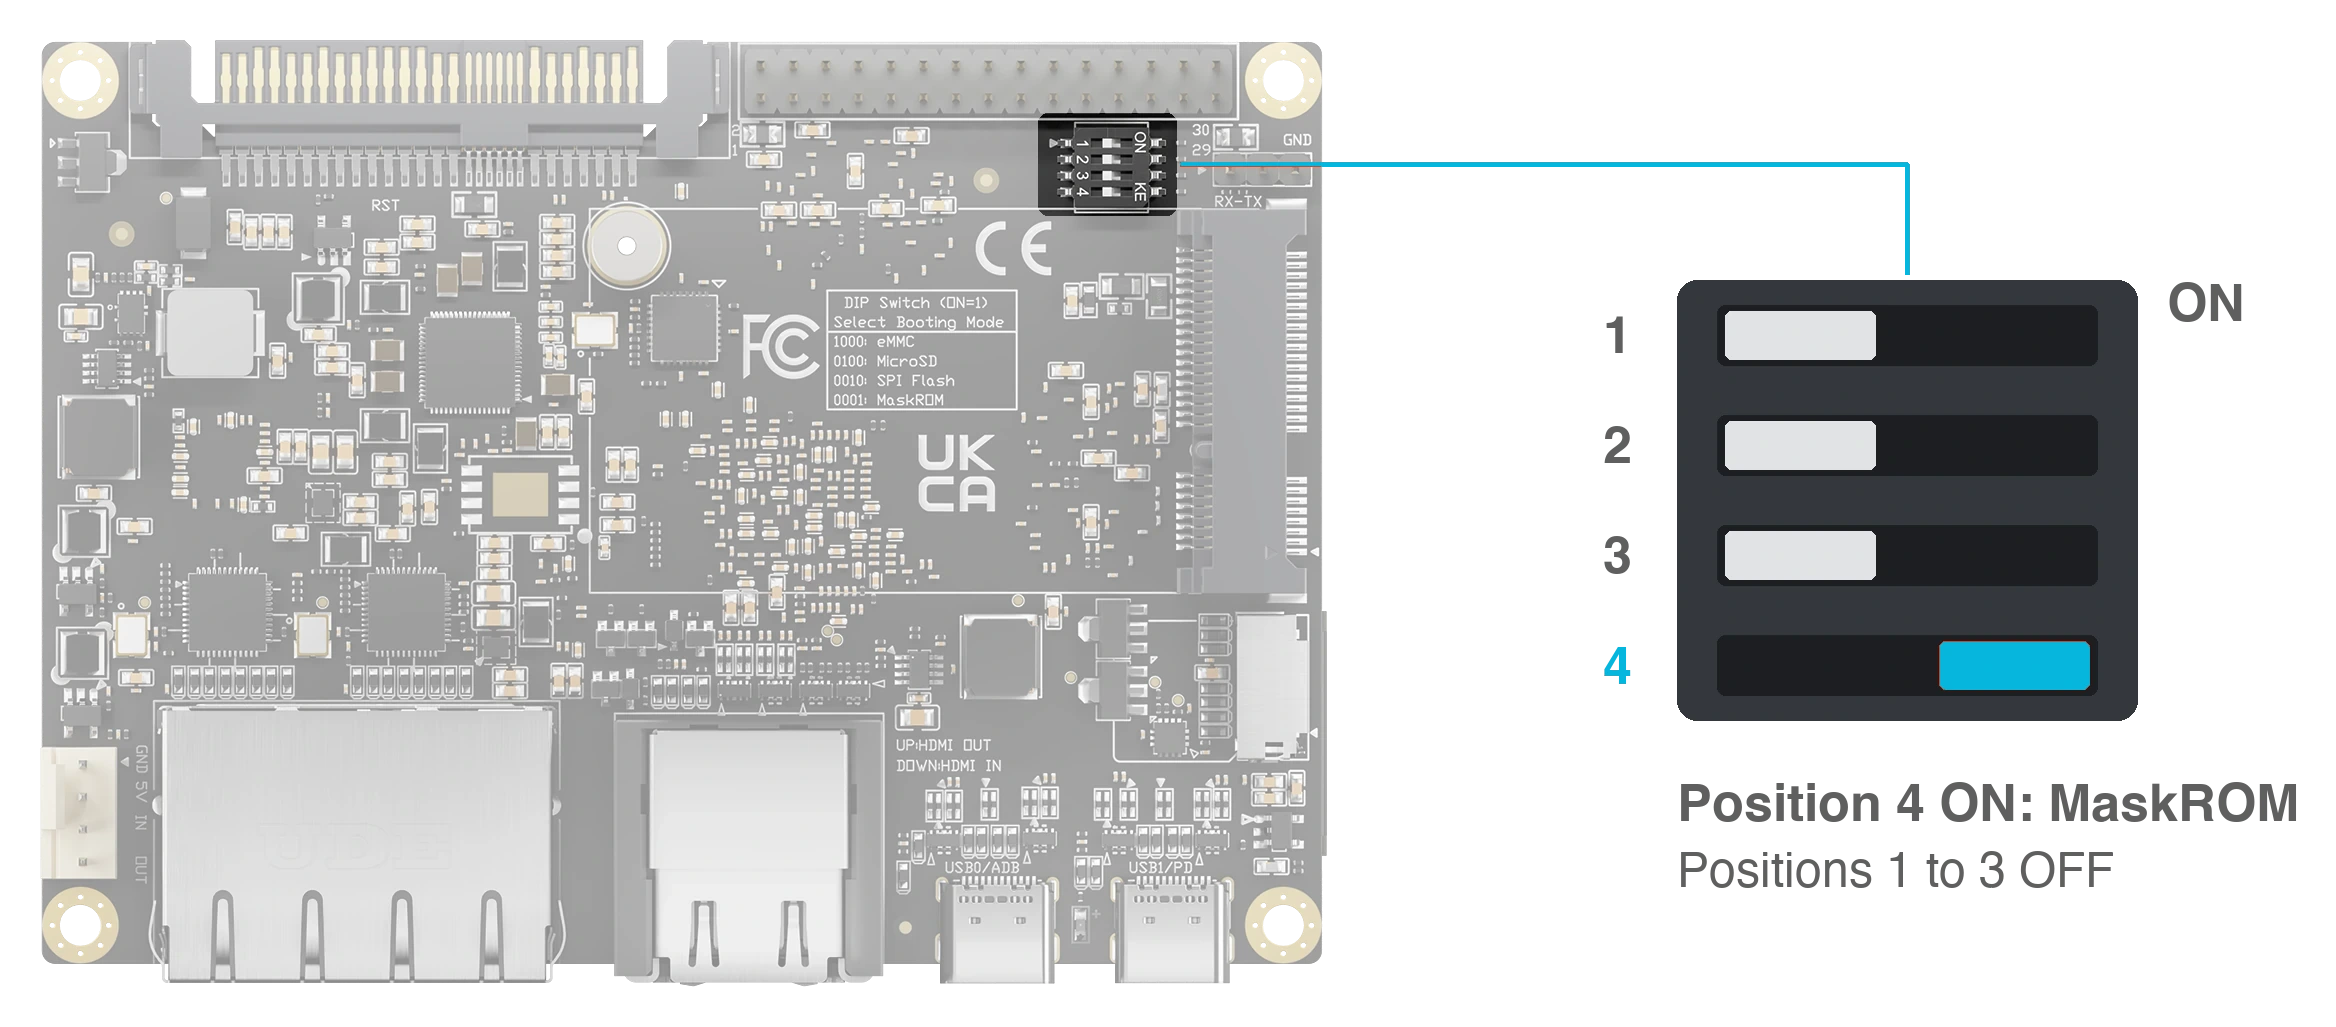
Figure 1. The boot switch. Position 4 ON selects MaskROM mode.
Step 4. Connect the board
Flashing uses both USB-C ports. The board needs the power adapter as well as the USB cable to enter MaskROM mode; USB0/ADB alone does not power it. Connect the power adapter last.
- Connect USB0/ADB, the USB-C port next to the HDMI ports, to the computer with the USB-C data cable.
- Connect the power adapter to USB1/PD, the USB-C port near the corner.
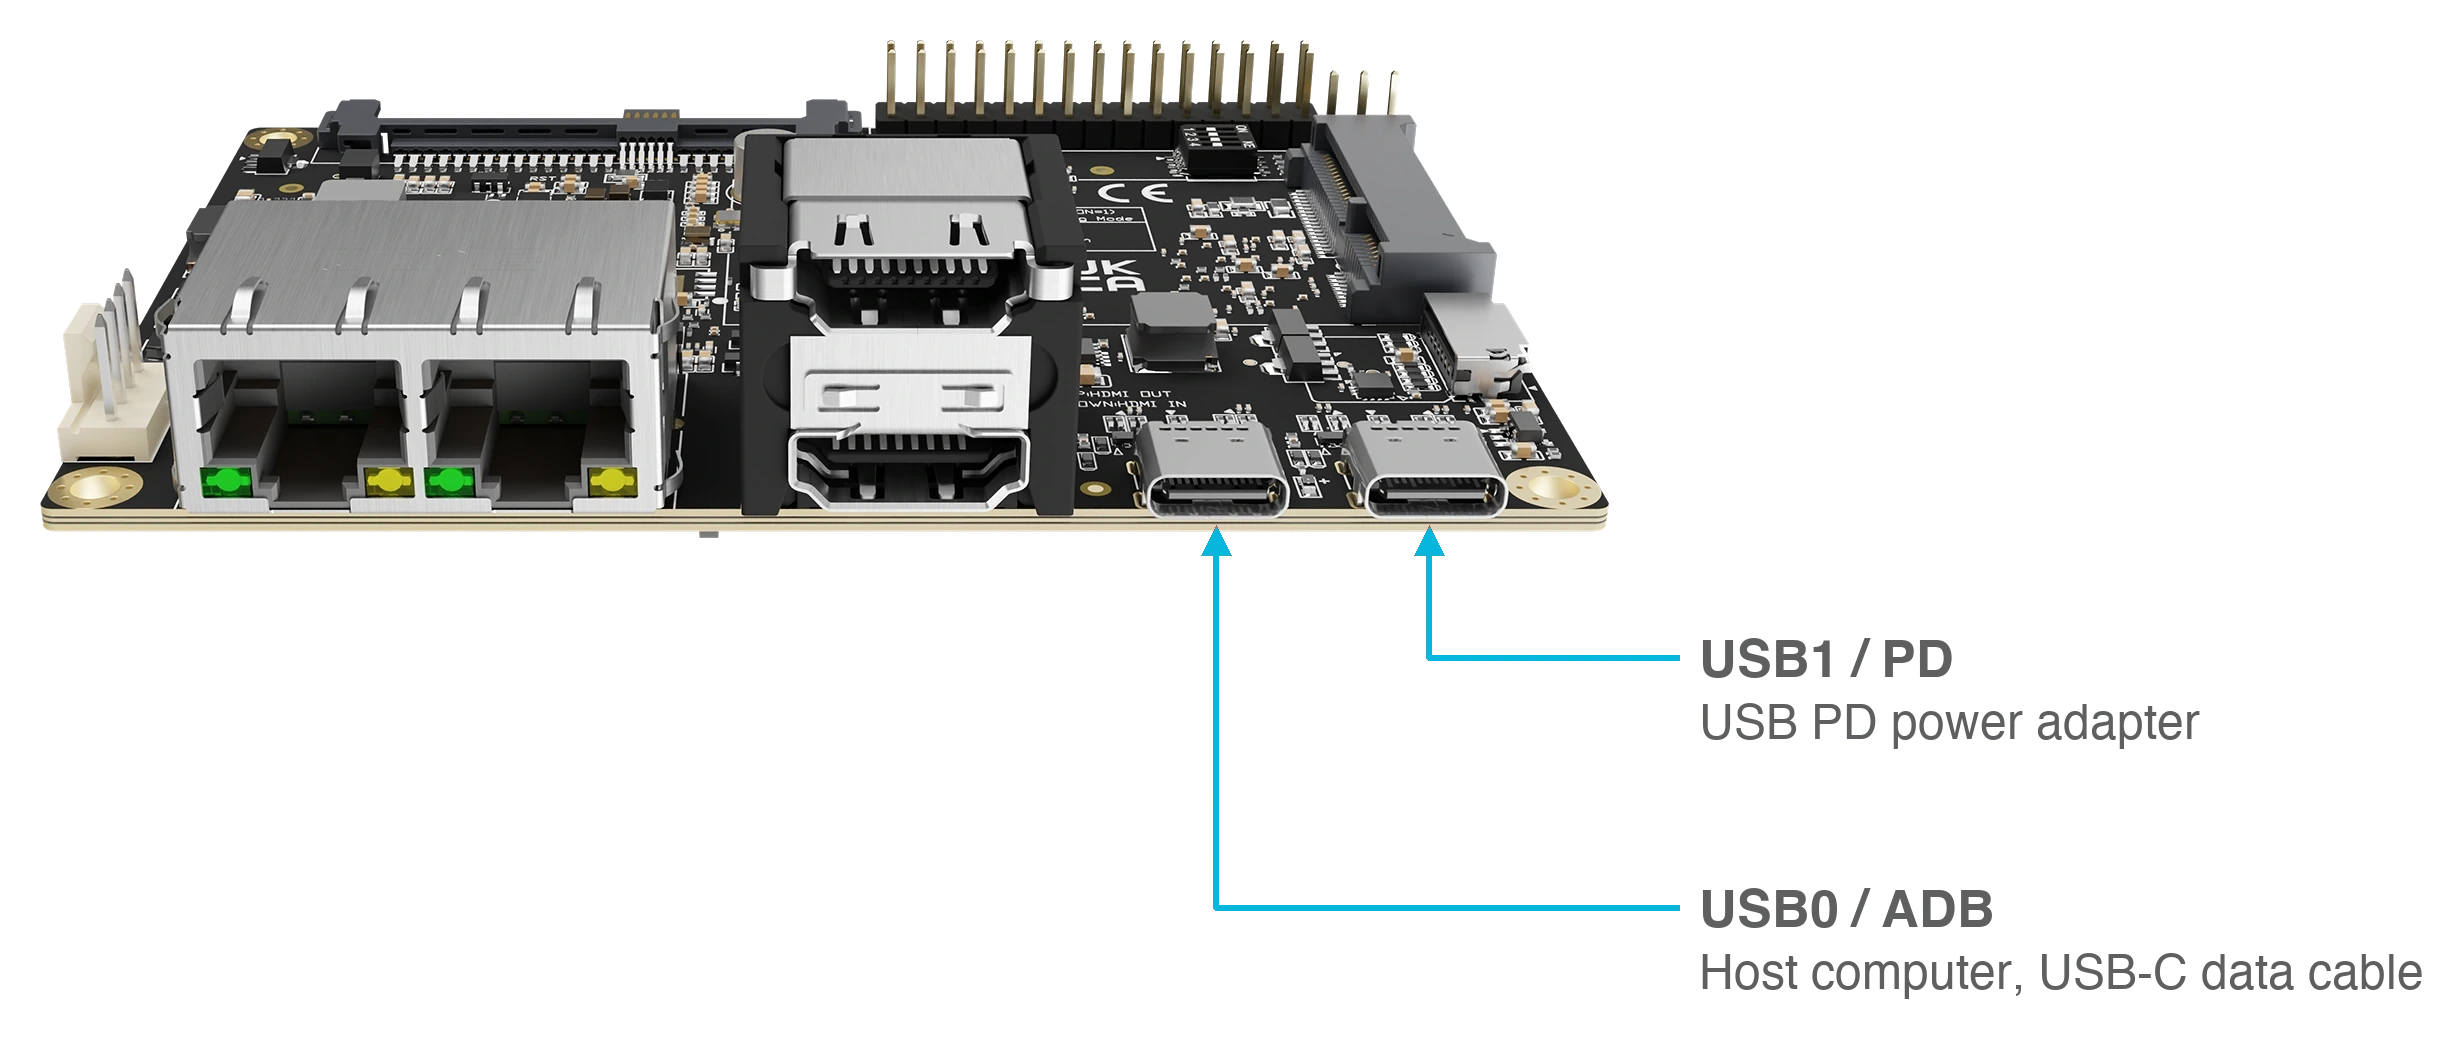
Figure 2. USB0/ADB to the computer, USB1/PD to the power adapter.
USB1/PD cannot be used for flashing, because it does not support USB OTG.
Step 5. Check that the tool sees the board
Start Rockchip Flash Tool. The Device area shows the board as Connected, with the chip RK3588 and the mode Maskrom. If it shows No device connected, click Refresh.
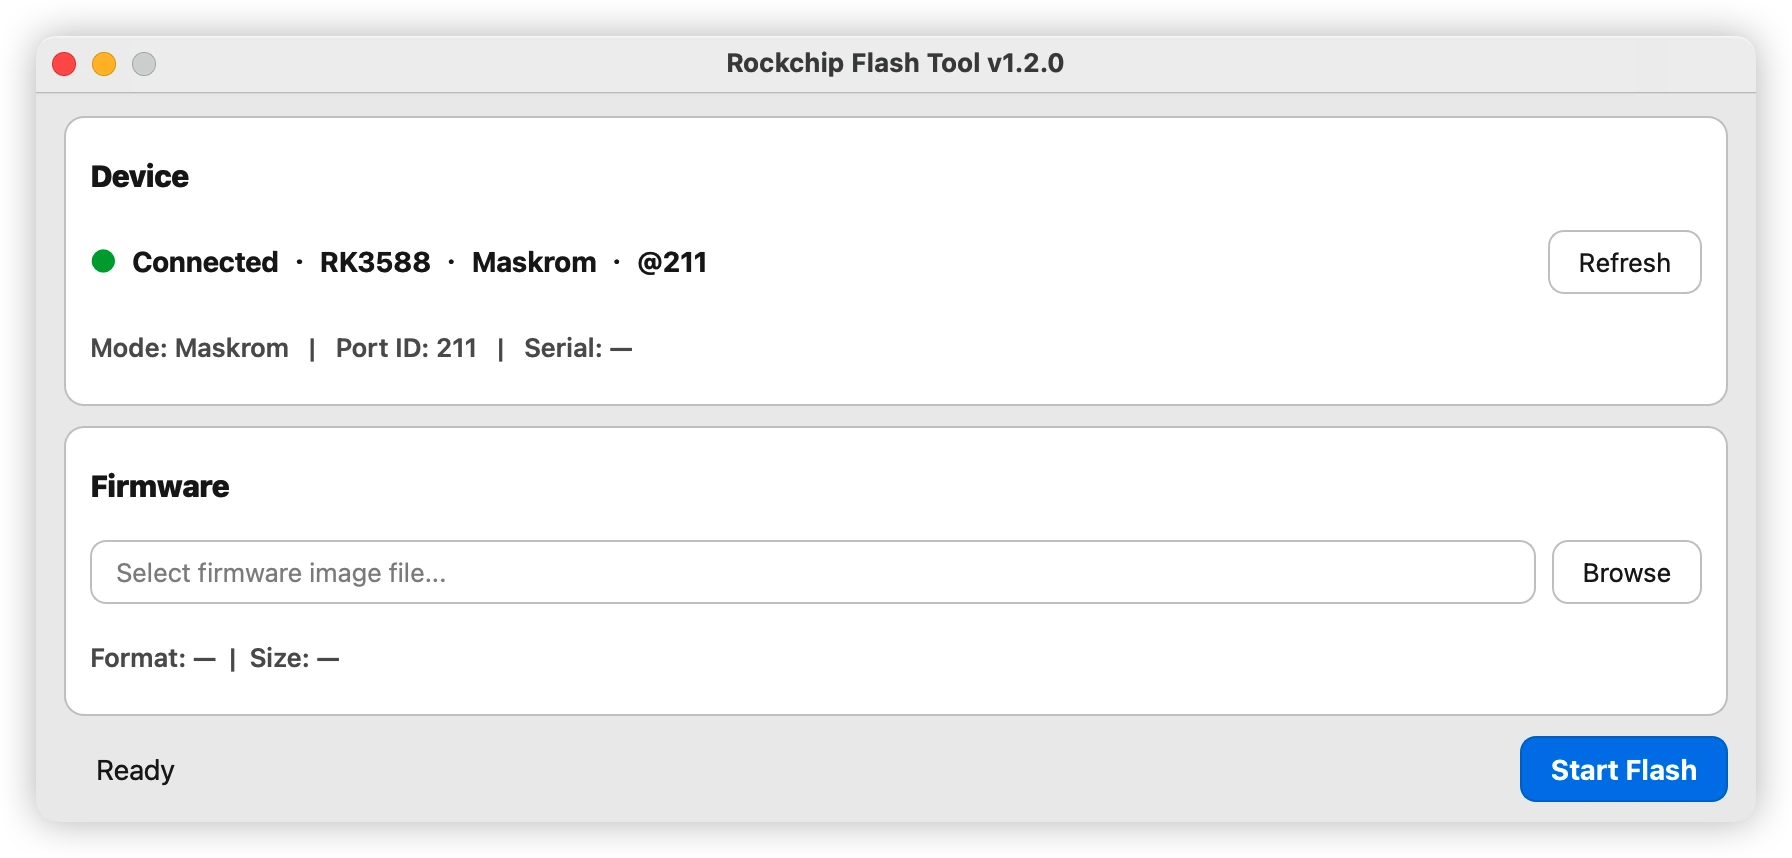
Figure 3. Blade 3 detected as RK3588 in Maskrom mode.
Step 6. Flash the image
- Under Firmware, click Browse and select the extracted image file. The tool shows its format and size.
- Click Start Flash. The status bar shows the progress.
Expected result: a Success dialog reports Flash completed.
With several boards connected, the Device area lists them all. Select the Blade 3 board you want to flash and do not change the USB connection during flashing.
Step 7. Leave MaskROM mode and boot
- Disconnect the power adapter and the USB cable from the computer.
- Turn position 4 of the boot switch back to OFF, so that the board boots from the eMMC again.
- Connect a monitor and keyboard as in Quick Start, or a serial console.
- Connect the power adapter to USB1/PD.
Expected result: the system you flashed starts successfully. What you see after booting and how you log in depend on the operating system. For Mixtile OS, see Connect to Blade 3.
Troubleshooting
| Problem | What to do |
|---|---|
The Device area shows No device connected | Check that the data cable is in USB0/ADB, not USB1/PD, and that it is a data cable, not a charge-only one. Check that position 4 of the boot switch is ON, then disconnect and reconnect the power adapter. Click Refresh. On Windows, make sure the USB driver is installed. |
| On Windows, Driver Not Detected appears after the driver is installed | Close the tool, then start it again with Run as administrator. |
| The mode shows Loader instead of Maskrom | The board is in Loader mode, which the tool also accepts. You can flash as normal. |
No partition table found; writing as a raw image. | You selected an archive or an unrelated file. Select the extracted image file. |
| More than one device matches | Move one board to a different USB port, then click Refresh. |
A Flash Failed dialog reports Flashing failed. | Disconnect the power adapter, reconnect it with position 4 still ON, and flash again. |
Device reset did not confirm; power-cycle the board. | Disconnect and reconnect the power adapter. |
| After flashing, the board comes back in MaskROM mode, or nothing appears on the monitor | Position 4 of the boot switch is still ON. Turn it OFF and power the board again. |